Rainbow Butterfly Face Paint and Airbrushing Tutorials
We're excited to share our tutorial on creating a stunning rainbow face paint design! With our step-by-step instructions and professional-quality supplies, you'll be able to create a beautiful and colourful look that's perfect for any occasion. Whether you're a beginner or an experienced artist, our tutorial is designed to help you achieve a flawless finish that will leave a lasting impression. We'll walk you through the airbrushing and traditional face-painting techniques needed to bring your rainbow butterfly design to life.
YOU WILL NEED
Before starting your design, ensure you have all the necessary supplies.
Mixing palette or plastic plate.
Airbrush and compressor
Butterfly Stencil Design
Air Brush Paint Mixture Preparation

STEP 1: PREPARE YOUR AIRBRUSH PAINT MIXTURE WITH DERIVAN FACE AND BODY PAINT
Before you can begin face painting with an airbrush, it's essential to create a paint mixture that can flow smoothly through the fine nozzle. To do this, start by grabbing a clean, empty container or cup. Then, add some White Derivan Face and Body Paint. Using a syringe or measuring spoon, slowly add small amounts of water until you achieve the desired consistency

STEP 2: ACHIEVE THE PERFECT CONSISTENCY
Once you've added small amounts of water to your Derivan Face and Body Paint, use a spoon or paddle pop stick to mix the paint thoroughly. Keep adding small amounts of water until the mixture easily drips off the end of the spoon or stick, flowing a little like water. This consistency is perfect for the fluro colours, white, and black face and body paints.
Derivan Face and Body Paint is a water-based and non-toxic paint that works seamlessly with an airbrush, producing a fine and even mist. Once your mixture is ready, carefully pour it into your airbrush paint cup and secure the lid.
Creating a Stunning Rainbow Butterfly Design with Your Airbrush

STEP 3: CREATE YOUR RAINBOW BUTTERFLY WINGS
Before you begin airbrushing, it's important to download a butterfly design and cut it out of acetate to use as a stencil. Once you have your stencil ready, place the right butterfly wing stencil onto the right-hand side of the face. Using your white face paint and airbrush, hold the airbrush about 10cm away from the person's face and start painting. Move the airbrush in a smooth, sweeping motion, keeping the brush at an even distance away from the skin to ensure even coverage.
Once the right side is complete, switch to the left-hand side of the face and repeat the process. By using the butterfly stencil, you'll be able to create a consistent and beautiful butterfly shape.

STEP 4: AIRBRUSH THE BODY STENCIL ONTO THE NOSE
Next, it's time to add the body stencil to the nose. With your airbrush and the appropriate paint colour, spray the body stencil onto the nose, making sure to keep the airbrush at an even distance away from the skin. Use a smooth and sweeping motion to ensure that the paint is applied evenly and consistently. By following these steps, you'll be able to achieve a beautiful and intricate rainbow butterfly design that's perfect for any occasion.

STEP 5: FILL IN THE WING AREAS WITH WHITE PAINT USING YOUR AIRBRUSH
In this step, you'll need to use your airbrush freehand to fill in the wing areas with white paint. Hold the airbrush about 10cm away from the skin and spray the white paint in a smooth and even motion. Be sure to stay within the wing area and avoid over spraying onto other parts of the face. By using the airbrush freehand, you'll be able to achieve a seamless and even finish for your rainbow butterfly design.

STEP 6: USE YOUR AIRBRUSH FREEHAND TO APPLY FLURO PINK PAINT
For this step, you'll need to change the paint in your airbrush to fluro pink. Once you have the right paint colour, use your airbrush freehand to spray around each edge of the wings. Be sure to keep the airbrush at an even distance away from the skin and use a smooth and sweeping motion to ensure even coverage. By using your airbrush freehand, you'll be able to achieve a beautiful and vibrant fluro pink colour that will make your rainbow butterfly design pop.

STEP 7: USE YOUR AIRBRUSH FREEHAND TO APPLY FLURO BLUE PAINT
After completing the fluro pink paint, it's time to switch the paint in your airbrush to Fluro blue. Use your airbrush freehand to paint inwards from the pink over the forehead, eyes, and cheeks. Keep the airbrush at an even distance away from the skin and use a smooth and sweeping motion to ensure that the paint is applied evenly and consistently. By using your airbrush freehand, you'll be able to achieve a flawless and vibrant finish for your rainbow butterfly design.

STEP 8: APPLY FLURO YELLOW PAINT TO THE INNER EDGES OF THE WINGS
With the blue paint completed, it's time to add fluro yellow to the inner edges of the wings. Use your airbrush freehand to apply the yellow paint, covering the eyes and eyebrows. Keep the airbrush at an even distance away from the skin and use a smooth and sweeping motion to ensure even coverage. By following these steps, you'll be able to create a stunning and vibrant rainbow butterfly design that's perfect for any occasion.

STEP 9: USE YOUR AIRBRUSH TO APPLY BLACK PAINT TO THE WINGS
Once the paint on the face has dried, it's time to add black colour to your airbrush. Place the wing stencil over one side of the face, covering the fluro wing. Gently hold the airbrush about 10 cm away from the face and lightly brush the areas within the stencil with black paint. Be sure to use a light touch and keep the airbrush at an even distance away from the skin to achieve an even and subtle black outline. Repeat the process on the other side of the face until both wings have a beautiful and defined shape. By following these steps, you'll be able to create a stunning and intricate rainbow butterfly design that's sure to impress.

STEP 10: COMPLETE THE BLACK OUTLINE ON BOTH SIDES OF THE FACE
Once you've finished outlining one side of the face, it's time to continue the process on the other side. Place the wing stencil over the remaining side of the face, covering the fluro wing. Use your airbrush to apply black paint to the areas within the stencil, being sure to use a light touch and keep the airbrush at an even distance away from the skin to achieve an even and subtle black outline. By following these steps, you'll be able to create a beautiful and symmetrical rainbow butterfly design that's perfect for any occasion.

STEP 11: APPLY BLACK PAINT TO THE NOSE TO COMPLETE THE BODY
Once you've completed the black outline on both sides of the face, it's time to finish the body of the butterfly. Use your airbrush to apply black face and body paint to the nose, making sure to keep the airbrush at an even distance away from the skin to ensure even coverage. By following these steps, you'll be able to create a stunning and complete rainbow butterfly design that's sure to turn heads.

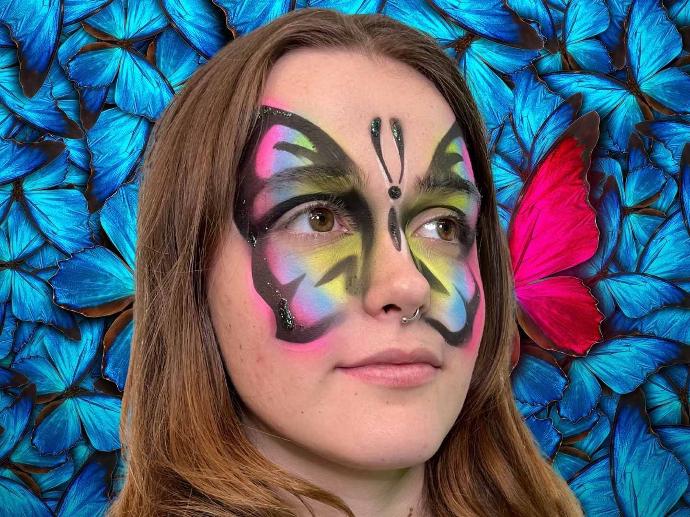
STEP 12: ADD GLITTER TO THE EDGES OF THE WINGS AND BODY
To add a little extra sparkle and shine to your rainbow butterfly design, it's time to add face and body glitter. Applying small amounts of glitter to the edges of the wings and body using a small brush. Use a light touch and apply the glitter sparingly to avoid clumps or uneven coverage. By following these steps, you'll be able to create a stunning and eye-catching rainbow butterfly design that's perfect for any occasion.