CROCODILE FACE PAINT DESIGN
Learn how to paint a face paint a killer crocodile face with this step-by-step guide. This cool crocodile is the perfect design for beginners and professionals, and thanks to this guide, a complex design can be made simple and easy with a bit of practice and patience. While at first glance this design can seem complicated, this guide will take you through the process of creating it step by step, so that anyone can have fun while making it. This guide will also help you learn some great techniques that are useful for other designs, but ultimately you will end up with an excellent crocodile design.

YOU WILL NEED
Before starting your crocodile face paint design, ensure you have all the necessary supplies.
A clean, well-lit workspace
A disposable surface to protect your workspace
A mirror for easy visibility
Smock or apron to protect your clothes
Disposable gloves for cleanliness
OR
You're ready to begin when you’re sure you have all the necessary tools!

STEP ONE | PREPARING THE SPONGE
Begin this design by covering the sponge with wite face paint then one half of one of the surfaces of the sponge with yellow paint with a brush. Then, over one half of this yellow section, use a brush to apply blue paint.

STEP TWO | BASE COLOUR PT. 1
To create the base for this design, start at the top of the forehead, slightly to the left, and gently dab the sponge onto the face, ensuring the blue side is on the outside, or towards the left of the face, and the yellow is on the inside, or towards the centre or right side of the face. Gently dab the sponge all the way down the face towards the chin to create a line of yellow down the centre of the face, slightly to the left, that transitions to a blue parallel line further left on the face.

STEP THREE | BASE COLOUR PT. 2
Using the same technique as above, but turning the sponge so that the yellow is inwards and the blue is face right, create a line down the centre of the face, slightly to the right, connecting the yellow halves of both lines to create a cohesive gradient across the face.
Any areas between the two base lines can be filled by dabbing the yellow side of the sponge over the area.

STEP FOUR | BLACK DETAILS
Using a round brush loaded with black paint, create small black ovals next to the nostrils, and lines from the corners of the mouth outwards towards the ears. With these lines extending from the mouth, you may vary the pressure applied to the brush to create different thicknesses in the line.
Use this brush to create a row of four curved lines at the top of the head, with a row below this containing three, and so on until the pattern is finished. This will create the crocodile skin pattern desired for this design.
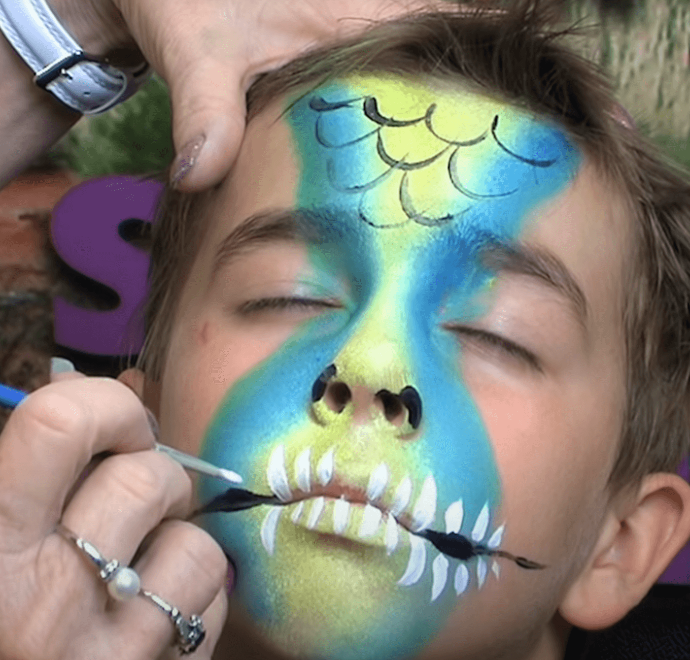
STEP FIVE | TEETH
Using the round brush and white paint, create short strokes from the inside of the lips outwards, to emulate teeth. At the edge of the lips, create four larger teeth strokes, two on each side, one on the top and one on the bottom. Then, continue the pattern outwards along the black line, reducing the size of the teeth until you reach the edge of the sponged on base colour.

STEP SIX | WHITE DETAILS
Using this same brush and paint, highlight the bottom of each curved line on the forehead with white paint, adding depth and highlight to the design.
Tips to make your next crocodile face paint design even better
There are plenty of ways to improve your next crocodile face paint design. For example, you can use different colours for the base of the crocodile depending on your preference, or the preference of whoever is receiving the design.
Practice your crocodile designs
As you can see, creating a crocodile face paint design isn’t difficult, but it does take some practice. If you follow the tips and steps outlined in this guide, you’ll be a pro in no time. With a bit of practice, you’ll be able to easily create scary crocodile face paint designs.
